How to set up the working mode, which mode I should choose as a extender/repeater?
You can select a working mode for the router on this page.
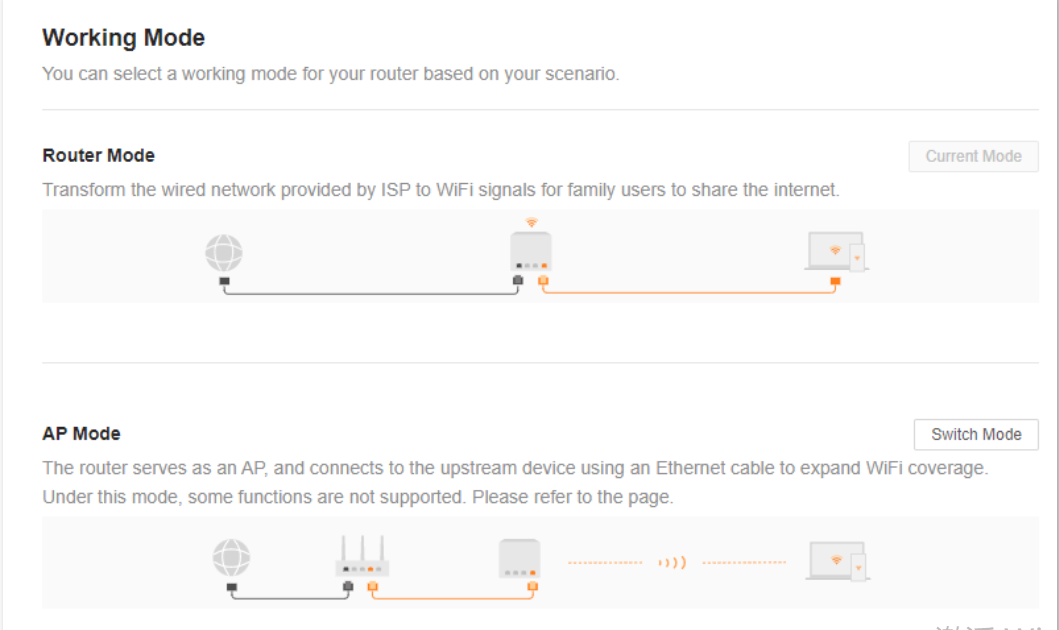
The router can work in the router mode, access point (AP) mode, Wireless Internet Service Provider(WISP)mode and Client+AP mode. Current Mode is displayed after the working mode currently adopted by the router, as shown in the following figure.
In this example, the current working mode is router mode. You can select a working mode based on the following scenarios:(TIP: Not all the models support the following 4 modes):
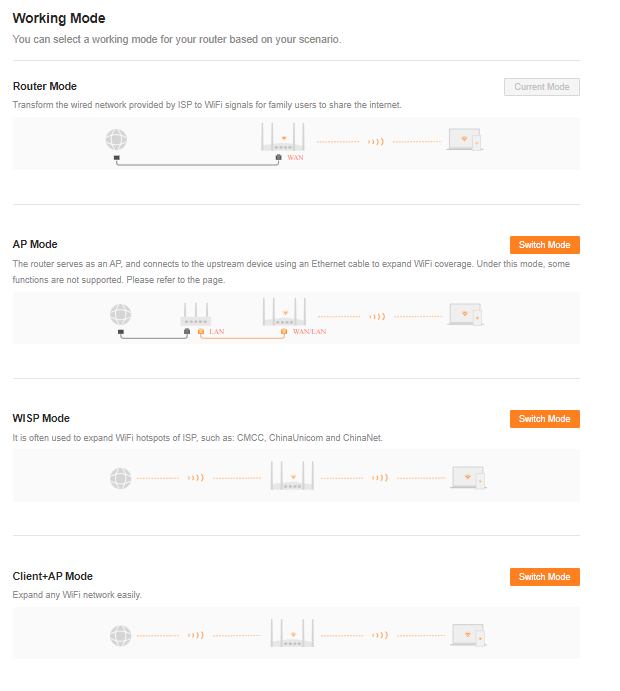
− To specify the network connection mode, select the router mode.
− To use an upstream router, select the AP mode.
- To bridge the hotspot of ISPs, select the WISP mode.
− To bridge all kinds of Wi-Fi networks, select the Client+AP mode.
Router mode:
By default, the router works in the router mode. All functions are available in this mode.
To switch the working mode from the other modes to router mode:
1. Log in to the web UI.
2. Choose More> Working Mode.
3. Click Switch mode.
4. Click OK.
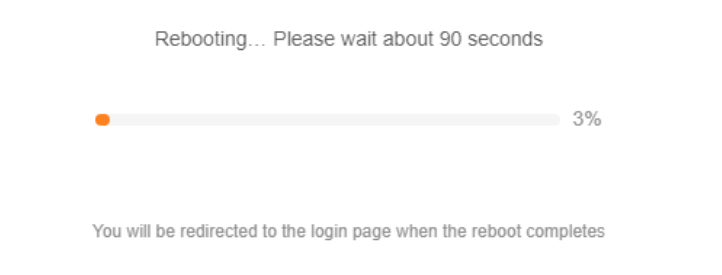
5 Wait until the device is restarted.
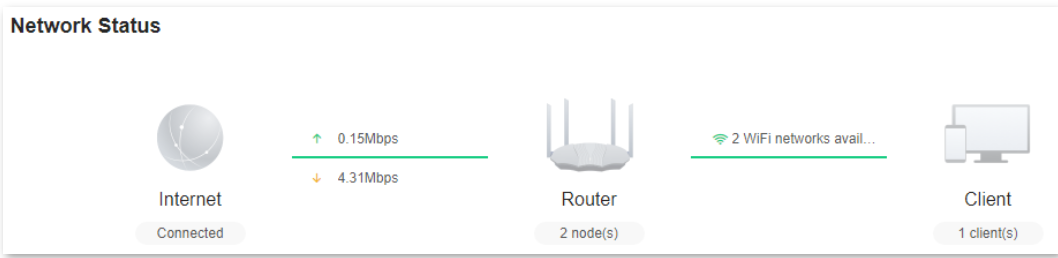
6 Log in to the web UI of the router again, and navigate to Network Status to check whether the router mode is configured successfully as shown below.
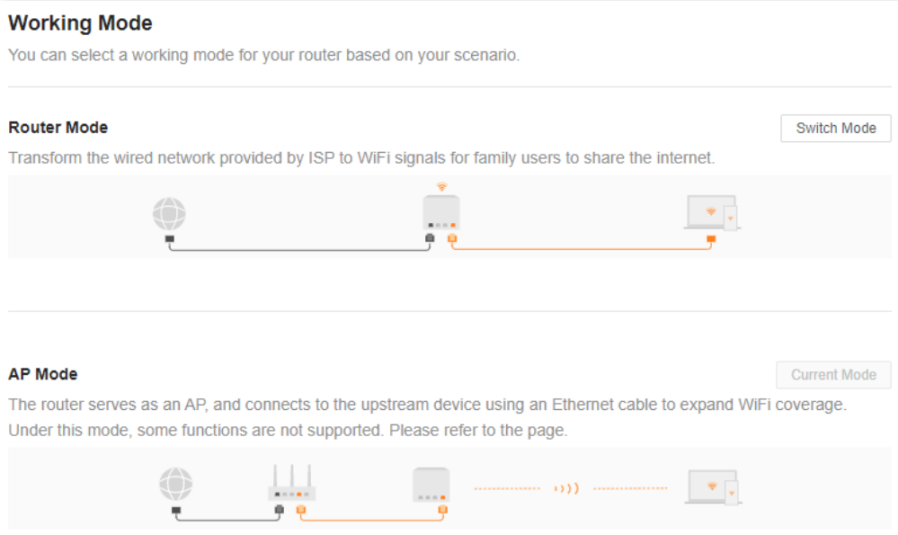
AP mode:
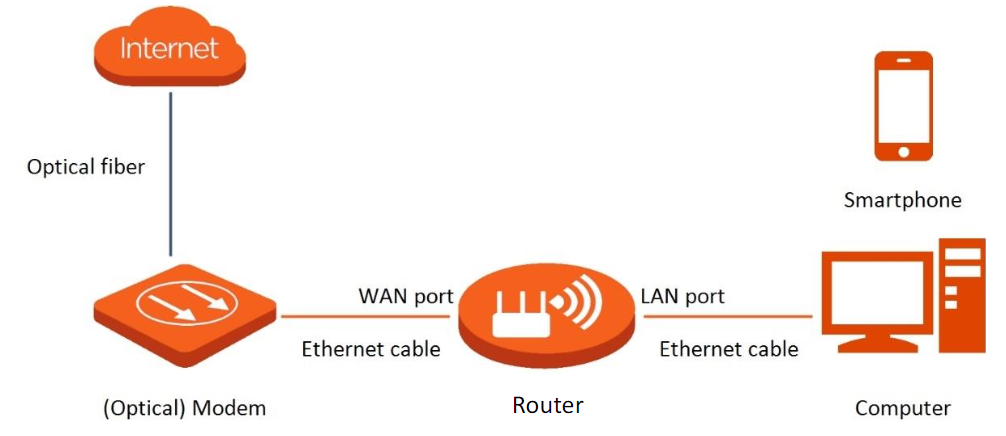
When you have a smart home gateway that only provides wired internet access, you can set the router to work in AP mode to provide wireless coverage.
When the router is set to AP mode:
⚫Every physical port can be used as a LAN port.
⚫The LAN IP address of the router will be changed. Please log in to the web UI of the router by visiting tendawifi.com.
⚫Functions, such as bandwidth control and port mapping will be unavailable. Refer to the web UI for available functions.
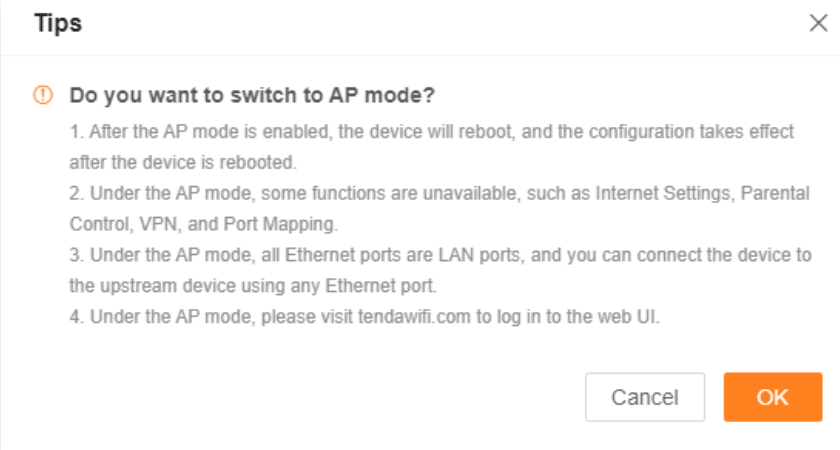
To switch the working mode to AP mode:
If you have finished the quick setup wizard before, start a web browser and visit tendawifi.com on a connected client, then start from point 3.
1 Log in to the web UI.
2 Choose More> Working Mode.
3 Click Switch mode after AP Mode.
4 Click OK.
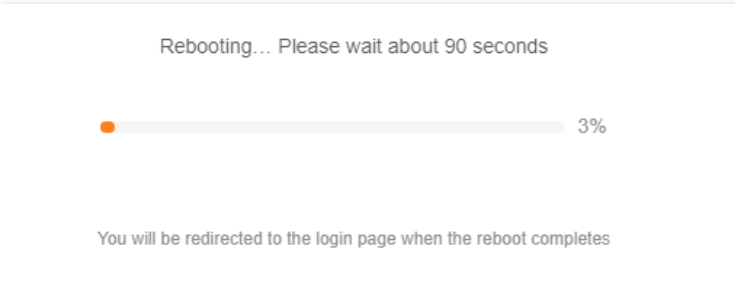
5 Wait until the device is restarted.
6 Connect the upstream device, such as a gateway, to any port of the router.
7 Log in to the web UI of the router again, and navigate to Network Status to check whether the AP mode is configured successfully as shown below.
If there is another network device with the same login domain name (tendawifi.com) as the router, log in to the upstream router and find the IP address obtained by the router in the client list. Then you can log in to the web UI of the router by visiting the IP address.
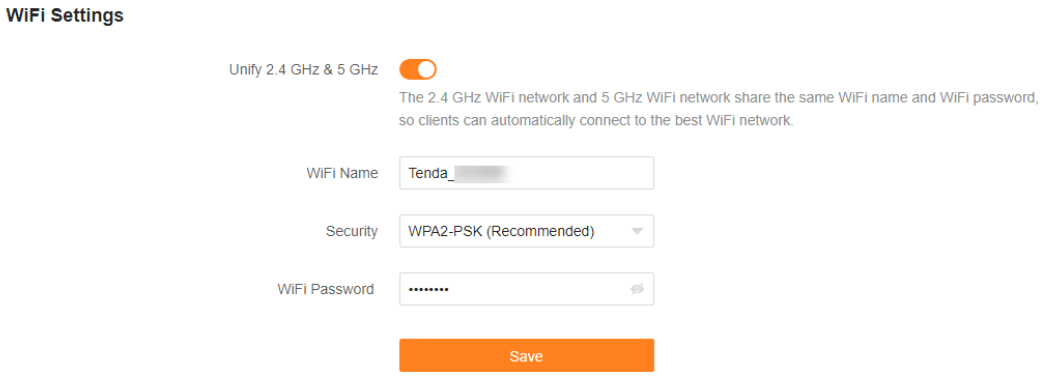
To access the internet, connect your computer to a physical port, or connect your smartphone to the Wi-Fi network.You can find the Wi-Fi name and password on the WiFi Settings page.
If the network is not encrypted, you can also set a Wi-Fi password on this page for security.
TIP:
If you cannot access the internet, try the following solutions:
⚫Ensure that the original router is connected to the internet successfully.
⚫Ensure that your WiFi-enabled clients are connected to the correct Wi-Fi network of the router.
⚫If the computer connected to the router can’t access the internet, ensure that the computer is configured to obtain an IP address and DNS server automatically.
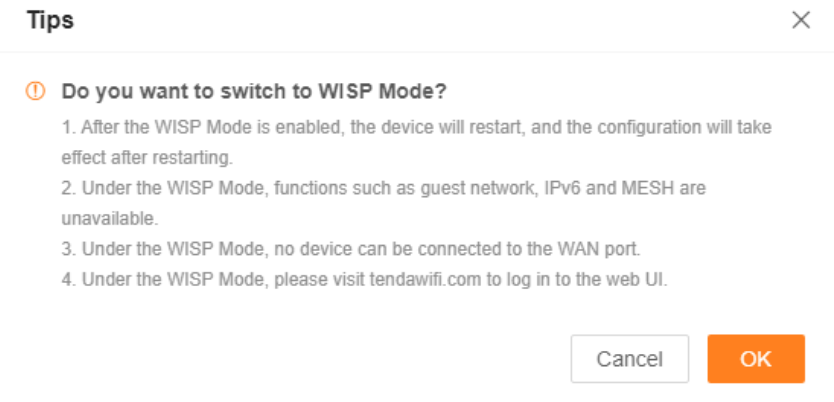
WISP mode
When there is already a router with internet access at your home, you can refer to the configurations in this part to extend the Wi-Fi hotspots of ISP. To switch the working mode to WISP mode:
If you have finished the quick setup wizard before, start a web browser and visit tendawifi.com on a connected client, then start from point 4.
⚫When WISP mode is chosen and the LAN IP of the router is at the same network segment as that of the upstream device, the router will change the LAN IP address to a different network segment to avoid conflict.
⚫After the router is set to WISP mode, you are required to access the internet by referring to the configuring procedures in Internet Settings based on the connection type you choose.
⚫Some functions will be unavailable. Refer to the web UI for available functions.
1 Place the new router near the original router and power it on. Connect your WiFi-enabled device to the Wi-Fi network of your new router, or connect a computer to a LAN port of the router. Do not connect any device to the WAN port of the new router.
2 Log in to the web UI.
3 Choose More> Working Mode.
4 Click Switch mode after WISP Mode.
5 Click OK.
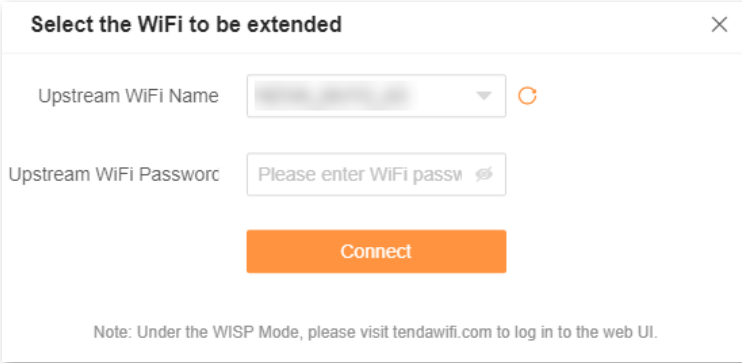
6 Select the Wi-Fi to be extended from the Upstream WiFi Namedrop-down list box,
set Upstream WiFi Password, and click Connect.
7 Wait until the device is restarted.
8 Log in to the web UI of the router again, and navigate to Network Status to check whether the WISP mode is configured successfully as shown below.
If the connection between the Upstream router and Router failed, try the following
solutions:
Ensure that you have entered the correct Wi-Fi password of the Wi-Fi network, and
mind case sensitivity.
Ensure that Router is within the wireless coverage of the Upstream router.
9 Relocate the new router by referring to the following suggestions and power it on.
−Between the original router and the uncovered area, but within the coverage of the original router.
−Away from microwave ovens, electromagnetic ovens, and refrigerators.
−Above the ground with few obstacles.
NOTE: Do not connect any device to the WAN port of the new router after setting the router to WISP mode.
To access the internet, connect your computer to a LAN port of the new router, or connect your smart phone to the Wi-Fi network of the new router.You can find the Wi-Fi name and password on the WiFi Settings page.
If the network is not encrypted, you can also set a Wi-Fi password on this page for security.
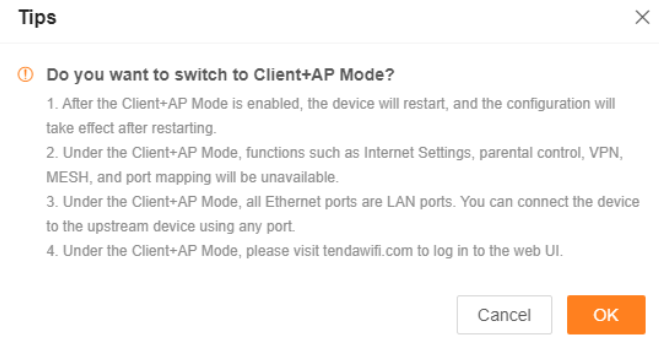
Client+AP mode
When there is already a router with internet access at your home, you can refer to the configurations in this part to extend any type of Wi-Fi network.To switch the working mode to WISP mode:
Some functions will be unavailable. Refer to the web UI for available functions.
If you have finished the quick setup wizard before, start a web browser and visit tendawifi.com on a connected client, then start from 4.
1 Place the new router near the original router and power it on. Connect your WiFi-enabled device to the Wi-Fi network of your new router, or connect a computer to a LAN port of the router. Do not connect any device to the WAN port of the new router.
2 Log in to the web UI.
3 Choose More> Working Mode.
4 Click Switch mode after Client+AP Mode.
5 Click OK.
6 Select the Wi-Fi to be extended from the Upstream WiFi Namedrop-down list box, set Upstream WiFi Password, and click Connect.
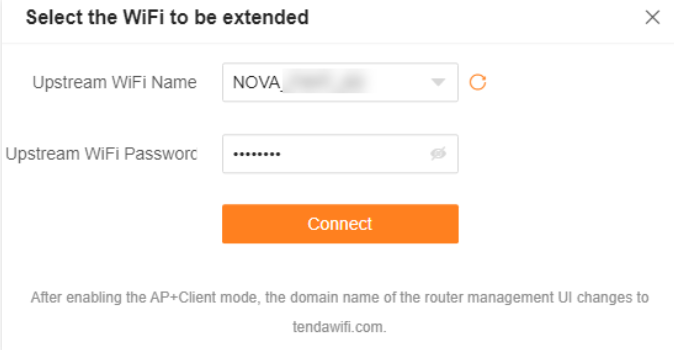
7 Wait until the device is restarted.
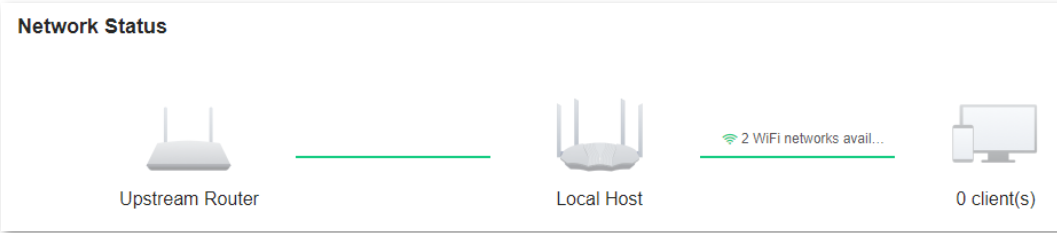
8 Log in to the web UI of the router again, and navigate to Network Status to check whether the Client+AP mode is configured successfully as shown below.
TIP: If the connection between the Upstream router and Router failed, try the following solutions:Ensure that you have entered the correct Wi-Fi password of the Wi-Fi network, and mind case sensitivity.Ensure that Router is within the wireless coverage of the Upstream router.
9 Relocate the new router by referring to the following suggestions and power it on.
−Between the original router and the uncovered area, but within the coverage of the original router.
−Away from microwave ovens, electromagnetic ovens, and refrigerators.−Above the ground with few obstacles.
After the new router is set to Client+AP mode:
⚫Do not connect any device to the WAN port of the new router.
⚫The LAN IP address of the router will change. Please log in to the web UI of the router by visiting tendawifi.com. If there is another network device with the same login domain name (tendawifi.com) with the router, log in to the upstream router and find the IP address obtained by the new router in the client list.
Then you can log in to the web UI of the router by visiting the IP address.